Polished concrete floors have character and they need to be chosen appropriately within your home design.FABIO PARODI
Todays polished concrete floors are obtained through grinding and polishing the concrete surface.
Depending on the depth of the grinding and the type of polishing required by the client, the surface may show (or not show) the aggregates and it can have a matte or either a glossy finishing.
Polished concrete floors that don’t show the aggregates within are an icon of minimalism interior design and they are often used in boutiques, lofts and for commercial spaces.
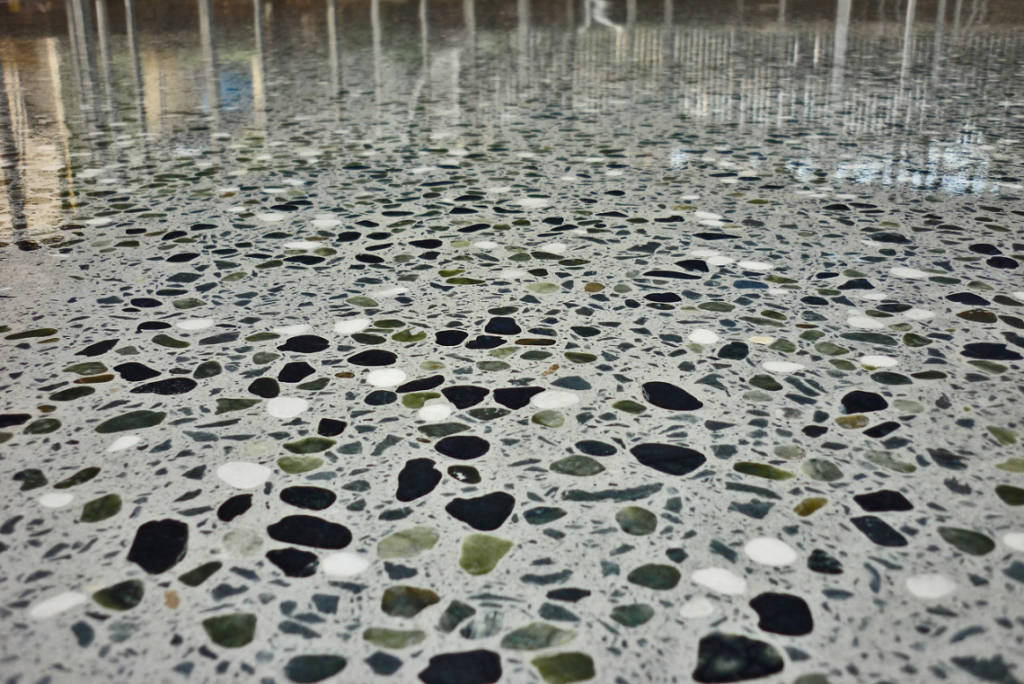
Polished concrete floors with exposed aggregates are a modern interpretation of a traditional floor: the “Terrazzo”.
The terrazzo can be traced back to the ancient mosaics of Egypt, its predecessors arrived from Italy. The form of terrazzo used today derives partly from the 18th century pavimento alla Veneziana and pavimento alla Genovese. Both pavements are created with marble fragments being placed next to each other in a mortar base (the marble fragments are smaller than in the pavimento alla Genovese).
It could be because I prefer modern designs with a vintage touch, or it might be because it reminds me my home town, but I really appreciate polished concrete floors with exposed aggregates.
I love them because, when they are created correctly, they are a unique, distinctive, hygienic, durable and thermally efficient flooring.
On the other hand, when they are badly constructed, they can look messy, unfinished… a disaster… that’s why I would suggest you consider the following 12 tips to get the best out of your polished concrete floor.
1. Choose the right architect. Polished concrete floors have character and they need to be chosen appropriately within your home design. An architect is able to emphasize the light reflections on the floor and able to give advice on the available colours and textures (ideally by showing you samples) is a great starting point.
2. Choose the right structural engineer. With a polished concrete floor, a structural element of the building (the reinforced concrete slab) becomes a decorative finishing. Reinforced concrete slabs are prone to cracks (e.g. soil subsidence, swelling soils, shrinkage induced stress…). The choice of a structural engineer with experience in foundation design will ensure a better and a safer result. Let your consulting engineer know that the polished concrete floor is important to you and that you are keen on exploring the best practices to achieve the best result. I say this because, without specification, your engineer will probably follow the industry standard specifying the most affordable (but not necessarily the best) products and techniques.
3. Choose the right foundation technology. Over the last twenty years conventional slabs on grade have been progressively substituted by waffle slabs with expanded polystyrene (EPS) void formers. Although this foundation system is an option for your house to become stronger and stiffer than a simple slab on grade, it presents a significant drawback for houses with polished concrete floor finishing. In fact, the lightweight EPS beads left within the slab float on the wet concrete during the pouring and cause damage to the surface.
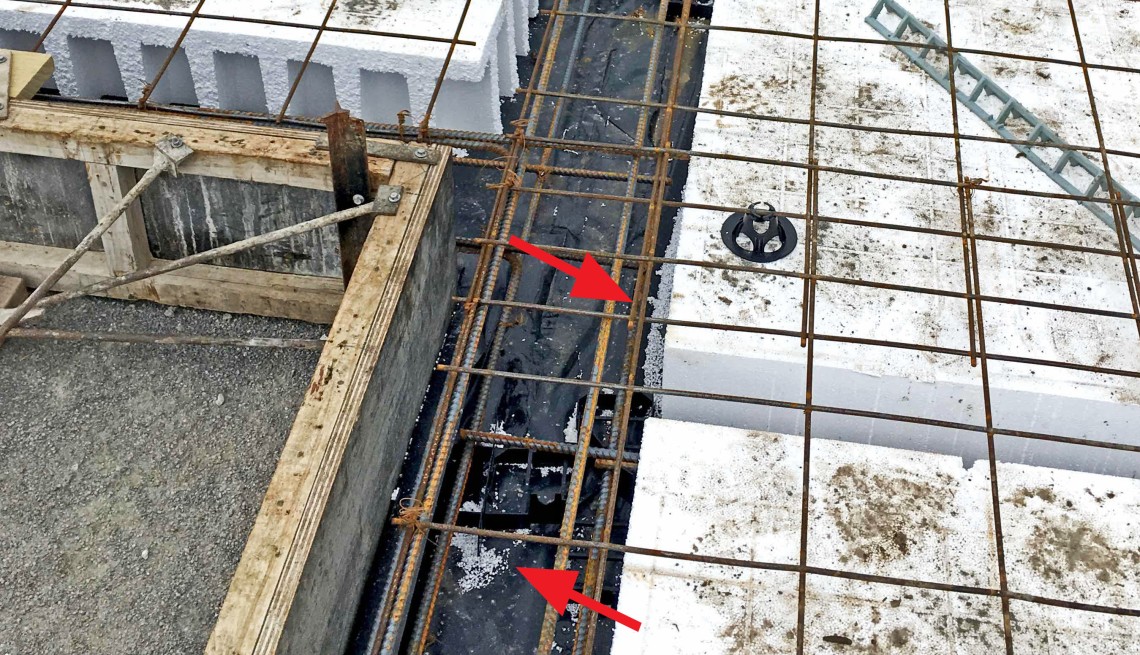
EPS beads in a waffle slab
Recently, in order to avoid this problem (and some other issues, see 10 reasons for choosing a Firth RibRaft® X-Pod™), a new waffle slab system using recycled polypropylene void formers has been introduced. Thanks to the design of the RibRaft® X-Pod™ void formers reduce the amount of slab saw cuts which in turn lessens shrinkage cracks.
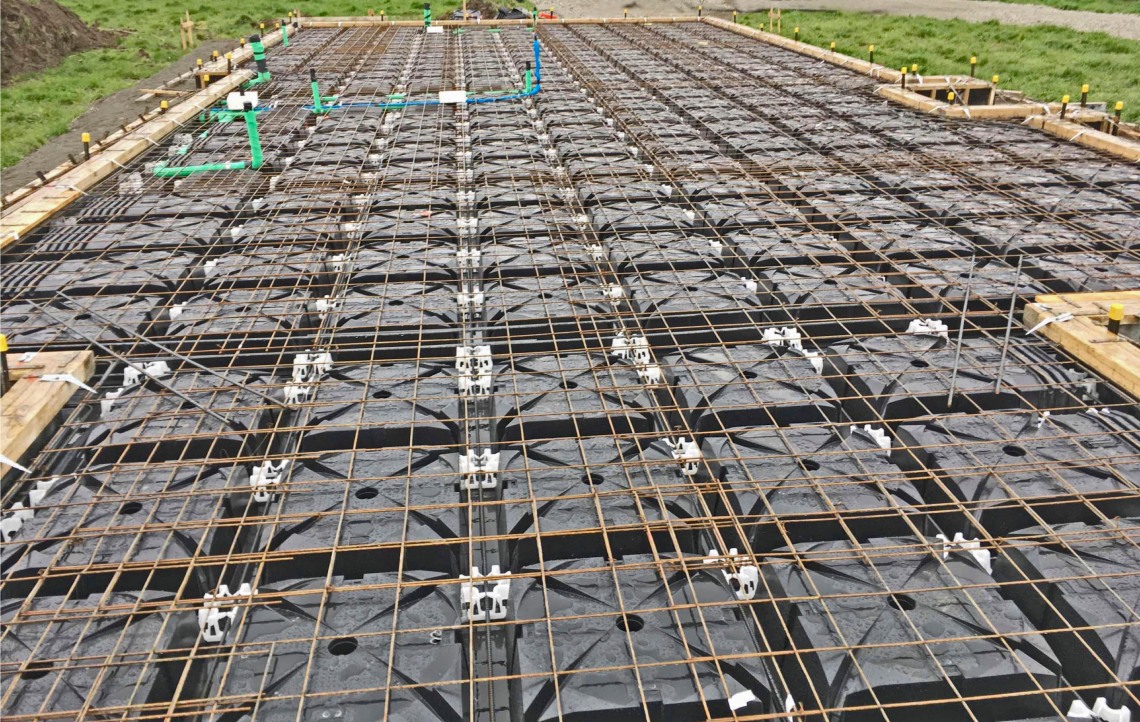
RibRaft® X-Pod™
4. Choose the right contractors. General purposes contractors may not have the skills, and this can hinder the best results for your concrete floor. To engage specialized and reputable contractors (both the foundation installer and concrete polisher) is hence paramount.
5. Require an adequate concrete recipe. The ingredients for your concrete recipe are aggregates, cement and water. The appearance of your polished concrete floor (especially if the aggregates are exposed) will depend on the type and size of the aggregates used within the mix. I strongly recommend approving a sample before pouring and to use one source for your cement and aggregate throughout the project. The concrete strength depends on the amount and the type of cement in the mix. A high content of cement (delivering a superior concrete strength than standard, Fc = 30 MPa instead of Fc = 20 MPa) ensures better results. A low water/cement ratio (achievable by using fluidifies) is also acceptable.
6. Colour. If you want to add integral colour, use liquid colour or make sure the disintegrating bags are removed from the batch (don’t let them disintegrate in the mix). If your floor will be dyed or stained, make sure your trowel blades are clean and use plastic trowel blades if possible.
7. Consider the use of a secondary reinforcement. A secondary reinforcement like polypropylene fibres will help minimize cracking. Please note: A wrong use of polypropylene fibres may damage the appearance of the polished surface. Expanding agents for shrinkage-compensated concrete may be used instead (or together with) polypropylene fibres.
8. Placing. Plan your pours from the front door to the back door, not side to side. This will put your pour joints front to back instead of side to side, reducing the impact of slight colour variation in the different pours.
9. Make sure the concrete cures properly. CCANZ recommendations are clear and detailed on this point. Cracks may occur in concrete construction for a variety of reasons. Unless appropriate measures are taken to control it, cracking in concrete construction is inevitable because concrete, like most other building materials, moves and changes with moisture content, it shrinks as it loses moisture. Cracks which form before concrete has fully hardened (pre-hardening cracks) are usually preventable by the adoption of good construction procedures. The most effective way to reduce the risk of plastic shrinkage cracking is to prevent rapid loss of moisture from the surface of the concrete. Practices to achieve this are:
• Dampen subgrade and forms ensuring any excess water is removed prior to placing concrete.
• In hot weather, lower the temperature of the fresh concrete by using cool aggregates and chilled mixing water.
• Create wind breaks to reduce wind velocity over the concrete surface.
• Use aliphatic alcohols sprayed over the surface prior to and after finishing before curing can commence to reduce the rate of evaporation from the surface.
• Commence curing promptly after finishing is complete and ensure the surface is subject to continuous curing.
If plastic cracking does become evident before the concrete has taken its initial set, the cracks may be closed by re-vibration of the concrete over the full depth of the cracks. This should be done, preferably, by an experienced operator, but a good rule of thumb is to permit re-vibration of concrete only if the vibrator will sink into the concrete under its own weight. Applying vibration before the concrete has begun to stiffen may allow the cracks to reopen. Applying it too late, i.e. after the concrete has begun to harden, may damage the bond with reinforcement or reduce its ultimate strength. Surface re-vibration may be only partially effective as it may not close the cracks to their full depth. They will then almost certainly recur as the concrete dries out. Most concrete, after it is placed, bleeds, i.e. water rises to the surface as the solid particles settle. The bleed water evaporates and there is a loss of total volume – the concrete has ‘settled’. Re-vibration of the concrete may help also to reduce settlement cracking. Other procedures which may help reduce plastic settlement cracking include:
• using lower slump mixes
• using more cohesive mixes
• using an air entrainer to improve cohesiveness and reduce bleeding
• increasing cover to top bars
10. Get the surface sealed. Densifiers and sealers should always be applied to polished concrete floors at different stages and they serve different purposes. Densification is the application of a liquid silicate hardener to a concrete surface to create a chemical reaction. The densification reaction process fills in the natural pores and voids in the concrete through a process of crystalline growth. The concrete is densified internally and inorganically. The same reaction also hardens the concrete and locks up the dust. After the colour (if applicable) and densifier have been applied, a sealer may be applied as the final step. A sealer brings out the beauty of decorative concrete flooring by enhancing the colour and the sheen. A sealant also protects the floor surface from abrasions and stains. Note: Some “old generation” sealants may be prone to delamination, scratching, chipping and wear.
11. Cutting. Depending of the size on the shape and on the foundation, technology used for your foundation, saw cuts might be required. The purpose of saw cuts is to weaken the surface of the concrete so that if any crack occur it can be hidden within clean and straight lines. Engineers usually require the floor to be saw cut in a 6 x 6 m pattern. Good engineers limit the saw cuts on areas prone to cracks preserving the uniformity and the beauty of the decorative floor. Make your saw cuts before you grind/polish to avoid finish degradation.
12. Slab protection. All trades involved on a job should understand how their spills and traffic can ultimately affect the success of the floor finish. Don’t allow trades to use the slab as a staging or cutting area as this could result in damage to the concrete or differential curing which can leave visible discolouration on the slab.
Fabio Parodi
CPEng(NZ,AU) Dott.Ing(ITA) M.Eng(Hons)
CEO and Founding Director of Cresco
www.cresco-group.com